
How to Use Gemini Omni Flash: Prompt Guide, Examples & Limitations
Gemini Omni Flash is a fast, high-quality video generation and editing model developed by Google. Unlike traditional video tools that require you to jump between separate text, image, and audio programs, this Omni Flash video model is built to understand all of these inputs at the same time. This allows you to combine words, pictures, and sound to create realistic videos where characters, objects, and lighting move naturally together.
1. How to Access and Use Gemini Omni Flash
To start generating and editing your videos, you can use the AI Video Generator at Gemini Omni Flash. Follow this straightforward step-by-step workflow:
- Open the Workspace: Access the generation panel directly at Omni Flash.
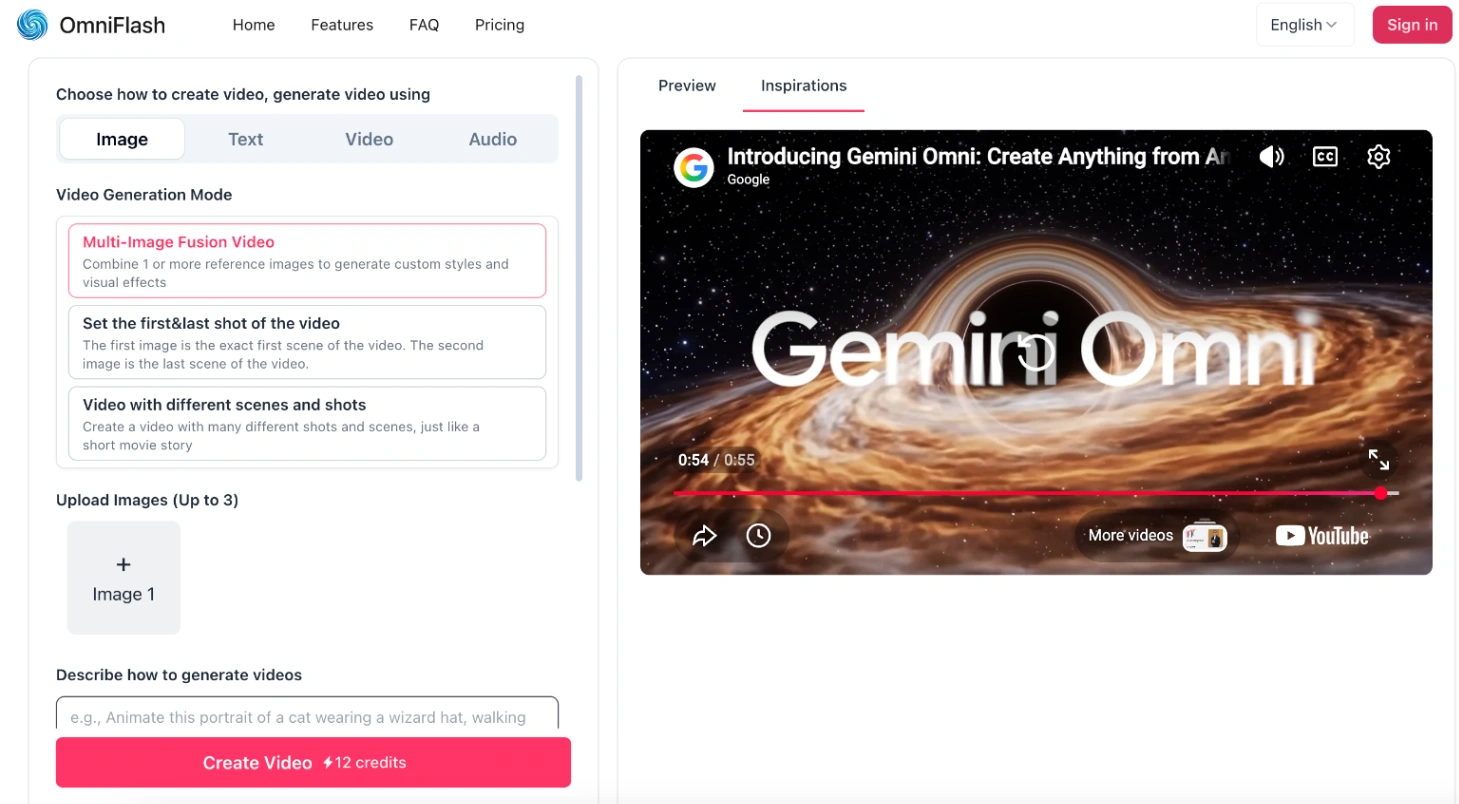
- Select Your Creation Method: Choose how you want to build your scene. You can generate videos using "Image", "Text", or "Video" files as inputs.
- Choose Your Video Generation Mode: The system defaults to "Image" mode. From here, you can select between two specific generation behaviors:
- Multi-Image Fusion Video (Default): Combine one or more reference images to generate custom styles, textures, and artistic visual effects.
- Set the first shot of the video: Lock the visual structure of your clip by ensuring your first uploaded image serves as the exact starting frame.
- Upload Your Visual Reference: Depending on the mode you selected, upload a single starting image or add multiple reference images to guide the style.
- Describe Your Scene: Input your text prompt in the description box to specify the target motion, actions, and details of the final output.
- Set Your Output Parameters: Choose a custom video duration from 3 to 10 seconds, and select your preferred output aspect ratio (16:9 widescreen or 9:16 vertical).
No credit card required · Instant Preview
2. The Gemini Omni Flash Prompting Guide
To get consistent results from Gemini Omni Flash, your written instructions should match how the model processes space, movement, and time. Based on our experience studying how the model reads descriptions, we have put together a few simple formulas to write highly effective prompts.
Keeping the Scene as a Single Shot
By default, Gemini Omni Flash tends to introduce multi-shot cinematic cuts to build a narrative sequence. If you want a smooth video that stays on a single subject without any cuts, you must state this clearly at the beginning of your description.
- How to structure it: [Camera movement style] + [Your subject] + [Background details] + [Exclusion terms]
- Prompt Example:
"Continuous, unbroken handheld shot of a vintage copper kettle boiling on a rustic stove, steam rising slowly into a sunlit cabin kitchen. A wooden spoon rests nearby on the counter. Sound design: Gentle bubbling, soft whistle of the steam. No dialogue".
Writing Negative Instructions
Because this video model does not support a dedicated negative prompt parameter, any exclusions must go directly into the main description. In our tests, simply adding direct instructions worked best to keep unwanted details out of the frame.
- How to structure it: [Description of your scene] + [Phrases like "No [element]" or "Do not include [element]"]
- Prompt Example:
"A peaceful campfire glowing softly in a misty forest at dusk. Do not include voiceover. No text overlay on screen".
Making Precise Edits
Surgical, brief instructions work best for sequential edits. Because long descriptions can confuse the model, the most reliable approach is to state exactly what to change and preserve the remaining elements.
- How to structure it: [What you want to change or add] + "Keep everything else the same".
- Prompt Example (To add an item):
"Add glowing purple neon underglow lights under the car. Keep everything else the same".
- Prompt Example (To remove an item):
"Make the red coffee mug invisible. Keep everything else the same".
Controlling the Timing of Events
This video model offers flexible control over when specific actions occur. Because there is no rigid syntax required, timing can be directed using either everyday conversational phrasing or a structured timecode format. This flexibility is particularly useful for establishing scene transitions, controlling pacing, or building fast-paced sequences.
Option A: Natural Language Phrasing
The model easily interprets chronological descriptions. Simply state when and what should happen using intuitive phrases such as "after 3 seconds" or "every 2s".
- Prompt Example:
A continuous shot of an acoustic guitar leaning against a dark brick wall. After 3 seconds, a warm spotlight slowly illuminates the instrument. At 6s, tiny dust motes begin to dance through the beam of light.
Option B: Bracketed Timecode Syntax
For scenes requiring precise segmenting, bracketed intervals can be used to divide the video chronologically.
- How to structure it:
[Start Second - End Second] [Action for this segment] - Prompt Example:
[0-4s] A close-up of a blue wax candle being lit by a match. [4-7s] The candle flame flickers gently in a quiet room. [7-10s] The candle is blown out, leaving a thin trail of white smoke rising in the dark.
Tagging Uploaded Images
When using multiple photos, you can tell the model exactly how to handle each one by adding simple bracket tags to your prompt. This prevents different visual styles from blending together.
<FIRST_FRAME>: Use this image as the exact opening scene.- Example:
<FIRST_FRAME> a vintage steamship battles rough ocean waves.
- Example:
<IMAGE_REF_N>: Use this image (starting from index 0) as a style or subject reference.- Example:
a futuristic sports car <IMAGE_REF_1> designed in the retro art style of <IMAGE_REF_0>.
- Example:
For complex projects, you can map multiple images to different time segments:
[0-3s] An ancient cavern exploration starting with explorer <IMAGE_REF_0> holding <IMAGE_REF_1>. [3-6s] Cut to a robotic companion <IMAGE_REF_2> scanning the wall with <IMAGE_REF_3>.
Explicit Declarations
For maximum control over multiple files, declare your sources and references at the beginning of the prompt, and add a brief instruction at the end:
[# Sources <FIRST_FRAME>@Image1] [# References <IMAGE_REF_0>@Image2] an elven warrior <IMAGE_REF_0> stands guard. Use Image1 as the starting frame. Use Image2 as the armor design reference.
- Prompt Example:
"In a single unbroken scene around a twilight campfire in a forest: <IMAGE_REF_0> is wearing <IMAGE_REF_5>, <IMAGE_REF_2> is wearing <IMAGE_REF_3>, and <IMAGE_REF_4> is wearing <IMAGE_REF_1>. They smile happily together as embers float into the evening sky.".
3. Practical Examples
Here are two realistic ways to put these formulas together for different projects.
Example 1: Educational Explainer Video
This prompt uses the Gemini Omni Flash's built-in knowledge of science to show a physical process accurately, while keeping the animation style highly detailed.
- Uploaded Image: A simple, hand-drawn sketch of a biological cell (labeled as your first image).
- Your Prompt:
"[# Sources <FIRST_FRAME>@Image1] A 3D claymation explainer showing the inner workings of mitochondria. The camera moves slowly along the outer membrane as energy molecules float nearby. Consider micro-detail, scientific accuracy, and timing to create a realistic academic scene. Use Image1 as the starting layout guide".
Example 2: Cinematic Timing & Action Sequences
This prompt uses precise bracketed timecodes to coordinate action beats chronologically within a single continuous scene, establishing a strong cinematic atmosphere through color contrast and timing.
- Your Prompt:
"[0-3s] A continuous handheld shot of a woman in a red coat standing still on a snowy city sidewalk looking forward. [3-6s] She slowly opens a bright yellow umbrella as soft snowflakes fall around her.".
Start creating with your custom timelines
Our Testing Observations: In our hands-on tests with over 100 video renders, we found that character facial consistency remains stable for up to 3 consecutive editing turns. By the 4th turn, a slight visual drift in background elements may occur. Additionally, simple on-screen text with fewer than 8 characters has a ~90% success rate of rendering clearly on flat surfaces.
4. Current Limitations & Guardrails
While Gemini Omni Flash is a highly capable video model, there are a few physical and regional limits to keep in mind so you can plan your projects effectively.
Regional Differences
- Europe, the UK, and Switzerland: Due to local privacy rules, users in these regions cannot upload or edit photos that feature minors or recognizable people. Additionally, uploading your own real-world videos to edit is not supported in these countries, though you can still edit any AI-generated video worldwide.
Reference File Limitations
- Audio References: You cannot upload your own music or voice files to use as templates yet. You must describe the sounds you want using text.
- Video References: If you upload a video clip to use as a reference, keep it under 3 seconds. Longer clips will not be processed correctly by the model.
- One Video at a Time: The model cannot read or compare multiple input videos at once. Trying to use more than one reference video will cause generation errors.
Unsupported Tasks
- Extending Video Length: The model cannot stretch a finished video to make it longer, and it cannot automatically generate a video that blends a separate starting photo and ending photo together.
- Editing Voices: You cannot edit or alter spoken dialogue inside your videos.
- No YouTube Links: You must upload the reference files directly. The model cannot load videos from YouTube links.
Output Details
- Video Duration: To maintain high detail and believable physics, the model is optimized to generate clips up to 10 seconds long.
- Watermarking: For digital provenance and verification, all generated videos contain an invisible digital watermark called SynthID. This watermark does not affect the visual quality of your video, but it allows programs to identify the clip as AI-generated.
Turn your reference images and text into reality